ROXANNE TROUP CHILDREN'S AUTHOR
  • Home
  • About
    • Bio
    • Media Kit
  • Books
    • Roxanne's Books >
      • My Grandpa, My Tree, and Me
      • Reaching For The Stars
      • All Books
    • Book Activities
  • Author Visits
    • School Visits
    • Adult Speaking Engagements
  • Writing Resources
  • Freelance
  • Contact

How Do Craters Form?

8/28/2024

 
Help kiddos discover the science behind craters with this fun activity.
​Prep:
*Fill pie plate with 1 1/2 inches of flour. 
*Spread sprinkles evenly over the flour. 
* Dust with cocoa powder 
two images of a cake pan filled with flour; one is sprinkled with colored sugar, showing the next step of experiment prep; the other is covered with cocoa powder
​Procedure :
Prior to experimenting, show your kiddos photos of the moon and have them describe what they see. Explain that the different colors of the moon's surface are different landforms. The small, dark circles are "old craters or bowl-like impressions; the bright spots are "new" craters.
image of moon from NASA
Materials:
*​round cake pan or pie plate *flour
*cocoa powder *sprinkles *paper plate
*small rocks, cotton balls, other round objects
*grey & white paints 
​ *moon photos
small cake pan filled with flour and surrounded by small round objects
1) Choose an object to conduct your experiment with. Hold it 6-12 inches above the pie plate.
2) D
rop (do not throw) object onto the surface of the pan. Examine the depression that forms. Notice the different colors and how they spread. This is what happens on the moon when space obejcts crash onto its surface. Underground materials "splash" to the surface.
sponge moon painting on paper plate
picture of pie plate filled with flour and cocoa, a blue nerf ball has been dropped on the surface to create a crater
​3) Choose another object and repeat this process. How is this crater different? Is it bigger? Deeper? Why?
Picture
​4) Redo the test with the first object, this time dropping it from a different height. What happened? Is the crater different size? Why?
5) What happens if you toss an object from a side angle? How does the crater change? What happens to all the under-the-surface materials? Keep exploring until the surface of your pan resembles the surface of our moon.
6) Then have your kiddos document their observations on a paper plate using cotton balls dipped in grey and white paints. 
7) Compare their "moon" to photos of our moon.

STEM Garden Project

3/18/2023

 
completed art project by Roxanne Troup of a recycled garden wind chime

Materials:

*a stick   *paint (not watercolor)    *scissors
*small metal objects   *fishing line   *cotton balls
*buttons or other outdoor-safe craft objects

Procedure:

1) Gather your materials and line your workspace with newspaper.
All kinds of animals enjoy garden produce. But if you're like me, you don't always want to share. To keep birds, rabbits, and squirrels from sneaking off with your food, create this fun garden project reminiscent of the orchard noisemaker in MY GRANDPA, MY TREE, AND ME. ​Bonus: It uses all recycled materials! (But it may take several days to complete, depending on dry times.)
craft materials including buttons, washers, metal nuts, soda pop tabs, paint, and fishing line
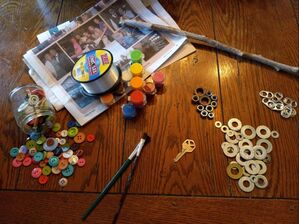
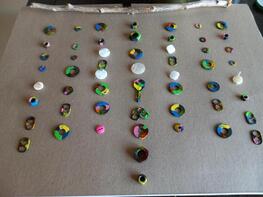
2) Paint the metal objects as desired. (I spray-painted mine black to provide consistency, let dry, then sponged in various colors using a cotton ball.)
painting found metal objects
3) Allow to dry; repeat for the opposite side.
4) Place your stick at the top of your workspace and lay out your objects as desired. (Tip: distribute weight evenly across the stick.) *see image 3 
5) Measure and cut fishing line 1 1/2 times the length of each column. Tie objects to line with a double knot, leaving 4-6 inches free at the top of each piece. (Tip: work one column at a time so your line doesn't get tangled.) There's no science to the spacing in this step. Just secure everything to the line. *see images 4 & 5
Picture
*image 4
painted metal objects strung on fishing line
*image 5
wrapping a stick with fishing line
*image 6
painted metal objects arranged in a multi-column pattern
*image 3
6) Cut another length of fishing line 1 1/2 times the length of your stick. Tie each end of your line to opposite ends of the stick to form a hanger. (Tip: the wrap-and-tie method provides extra strength.) *see image 6
7) Starting with the two outside columns, tie the lines to the stick at roughly the same distance. This is the part that requires a bit of science. You want to distribute the weight as evenly as possible.
​(Tip: it helps to hang the stick up, or have someone hold it, while you tie.) *see image 7
8) Continue tying columns of objects to the stick, 1 1/2 to 2 inches apart. (Tip: work from the outside-in to maintain balance.)
9) Hang your completed project outside and enjoy!

MY GRANDPA, MY TREE, AND ME
More Book Crafts
partially completed art project hanging by a doorknob
*image 7

    Roxanne Troup

    Children's author writing about nature and family.

    Categories

    All
    Book Crafts
    ELA Activity
    Gifts
    Pecan
    Seasonal
    Space
    STEM Activity

Proudly powered by Weebly
  • Home
  • About
    • Bio
    • Media Kit
  • Books
    • Roxanne's Books >
      • My Grandpa, My Tree, and Me
      • Reaching For The Stars
      • All Books
    • Book Activities
  • Author Visits
    • School Visits
    • Adult Speaking Engagements
  • Writing Resources
  • Freelance
  • Contact