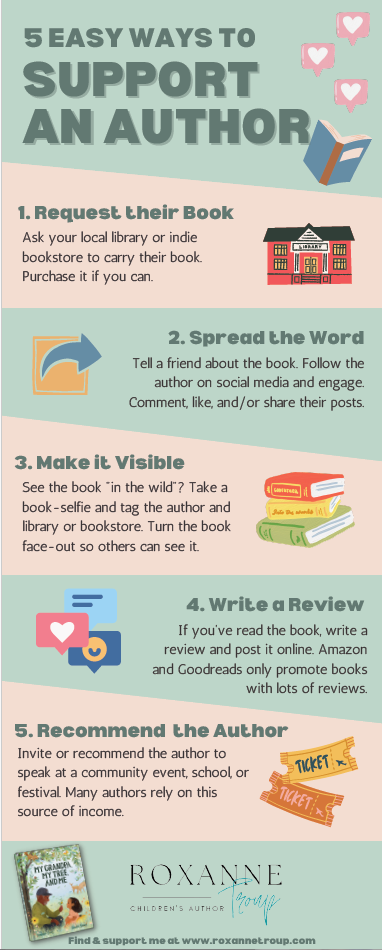
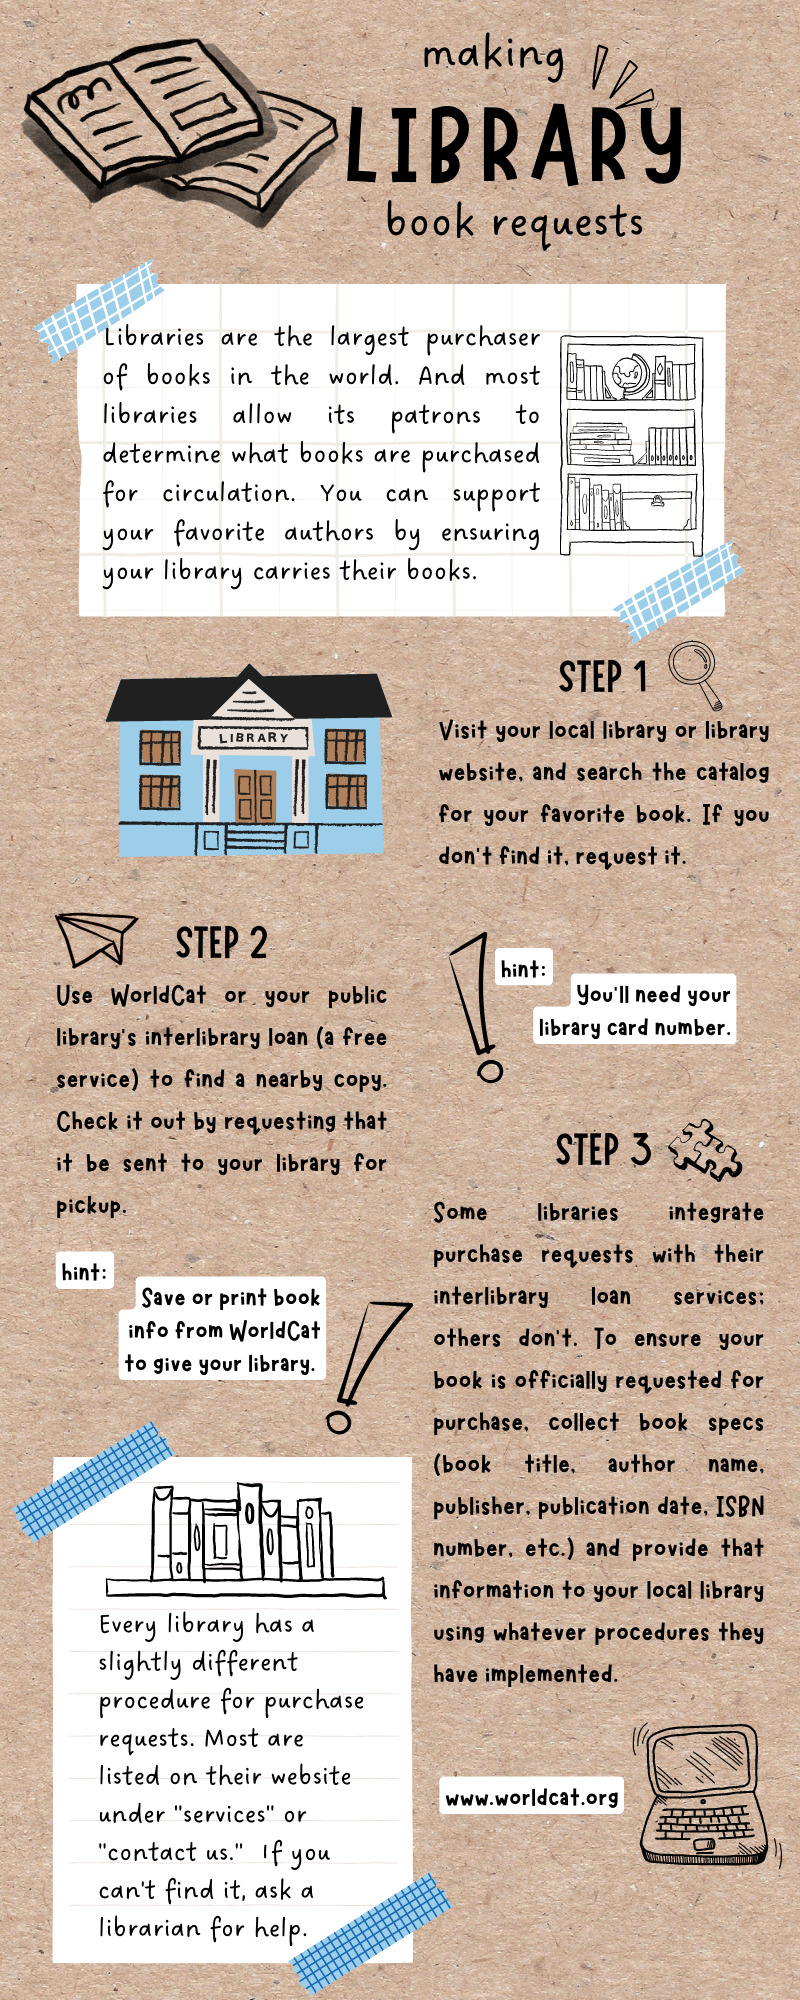
ROXANNE TROUP CHILDREN'S AUTHOR
  • Home
  • About
    • Bio
    • Media Kit
  • Books+
  • Author Visits
    • School Visits
    • Adult Speaking Engagements
  • Writing Resources
  • Freelance
  • Contact

STEM Garden Project

3/18/2023

 
completed art project

Materials:

*a stick   *paint (not watercolor)    *scissors
*small metal objects   *fishing line   *cotton balls
*buttons or other outdoor-safe craft objects

Procedure:

1) Gather your materials and line your workspace with newspaper.
All kinds of animals enjoy garden produce. But if you're like me, you don't always want to share. To keep birds, rabbits, and squirrels from sneaking off with your food, create this fun garden project reminiscent of the orchard noisemaker in MY GRANDPA, MY TREE, AND ME. ​Bonus: It uses all recycled materials! (But it may take several days to complete, depending on dry times.)
craft materials including buttons, washers, metal nuts, soda pop tabs, paint, and fishing line
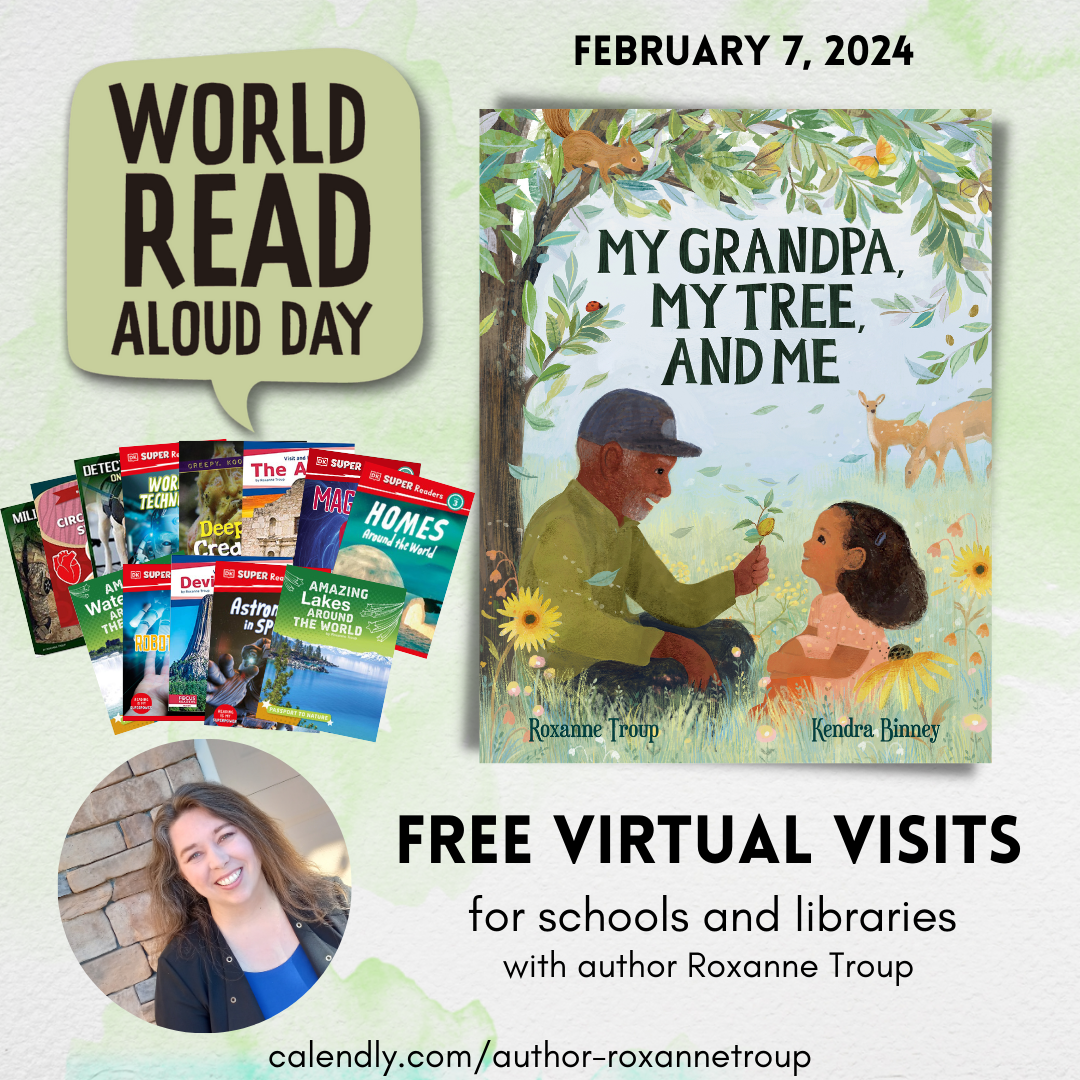
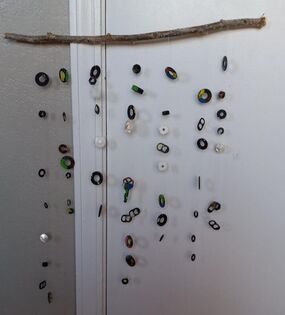
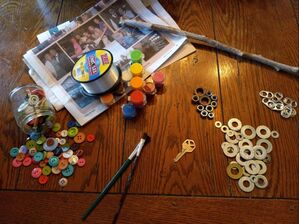
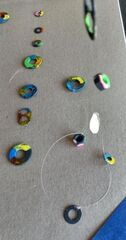
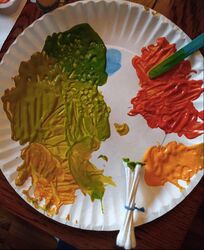
2) Paint the metal objects as desired. (I spray-painted mine black to provide consistency, let dry, then sponged in various colors using a cotton ball.)
painting found metal objects
3) Allow to dry; repeat for the opposite side.
4) Place your stick at the top of your workspace and lay out your objects as desired. (Tip: distribute weight evenly across the stick.) *see image 3 
5) Measure and cut fishing line 1 1/2 times the length of each column. Tie objects to line with a double knot, leaving 4-6 inches free at the top of each piece. (Tip: work one column at a time so your line doesn't get tangled.) There's no science to the spacing in this step. Just secure everything to the line. *see images 4 & 5
Picture
*image 4
painted metal objects strung on fishing line
*image 5
wrapping a stick with fishing line
*image 6
painted metal objects arranged in a multi-column pattern
*image 3
6) Cut another length of fishing line 1 1/2 times the length of your stick. Tie each end of your line to opposite ends of the stick to form a hanger. (Tip: the wrap-and-tie method provides extra strength.) *see image 6
7) Starting with the two outside columns, tie the lines to the stick at roughly the same distance. This is the part that requires a bit of science. You want to distribute the weight as evenly as possible.
​(Tip: it helps to hang the stick up, or have someone hold it, while you tie.) *see image 7
8) Continue tying columns of objects to the stick, 1 1/2 to 2 inches apart. (Tip: work from the outside-in to maintain balance.)
9) Hang your completed project outside and enjoy!

MY GRANDPA, MY TREE, AND ME
More Book Crafts
partially completed art project hanging by a doorknob
*image 7

Build a Sensory Poem

3/18/2023

 
pecan image
Here's a fun way to help your kiddos use more descriptive words in their writing (and teach them about adjectives at the same time):

Sensory Poems

Bonus-it's really easy!
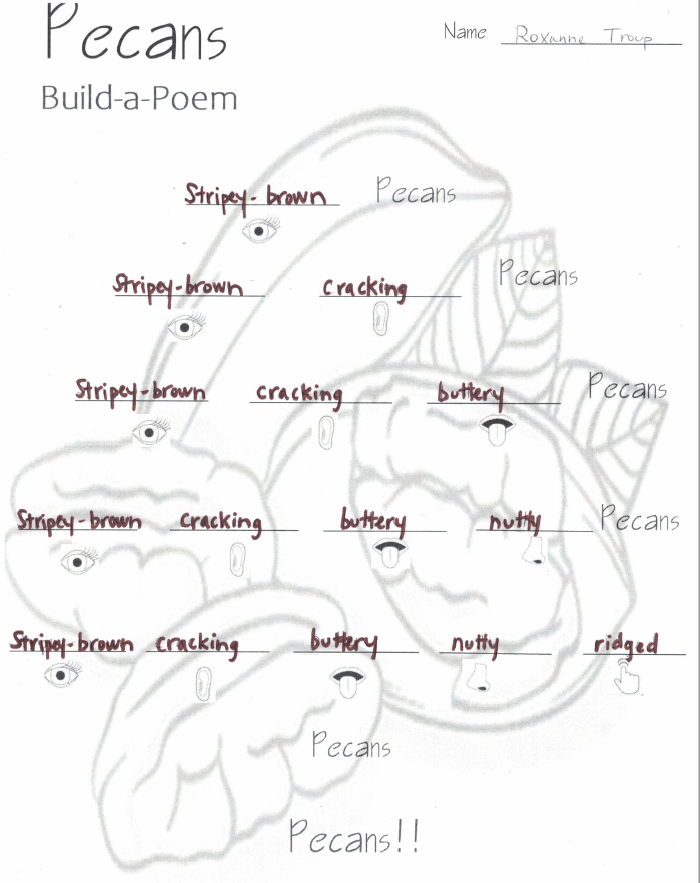
Just download these worksheets and grab an object that's safe to explore with the senses (i.e. can be put in the mouth).
Since my new book is all about pecans (and I have a fantastic science experiment that would tie into this ELA activity perfectly), I chose a pecan.

Procedure:

1) Print one set of worksheets per child.
​2) Place the object before the child, but instruct them not to touch until prompted.
3) Describe what we're about to do (write a poem about ________ by focusing on our senses) and review the five senses (sight, smell, sound, taste, touch).
MY GRANDPA, MY TREE, AND ME book cover
4) ​Beginning with sight, help them think of different ways to describe the object based only on what they see. (That might include things like color, shape, and size.) Use the "word bank" to record each descriptive word/phrase in the "sight" column.
5) Repeat this step for each column/sense on the "word bank," helping only when necessary. (Leave taste for last.) Encourage the children to add at least three words in each column.
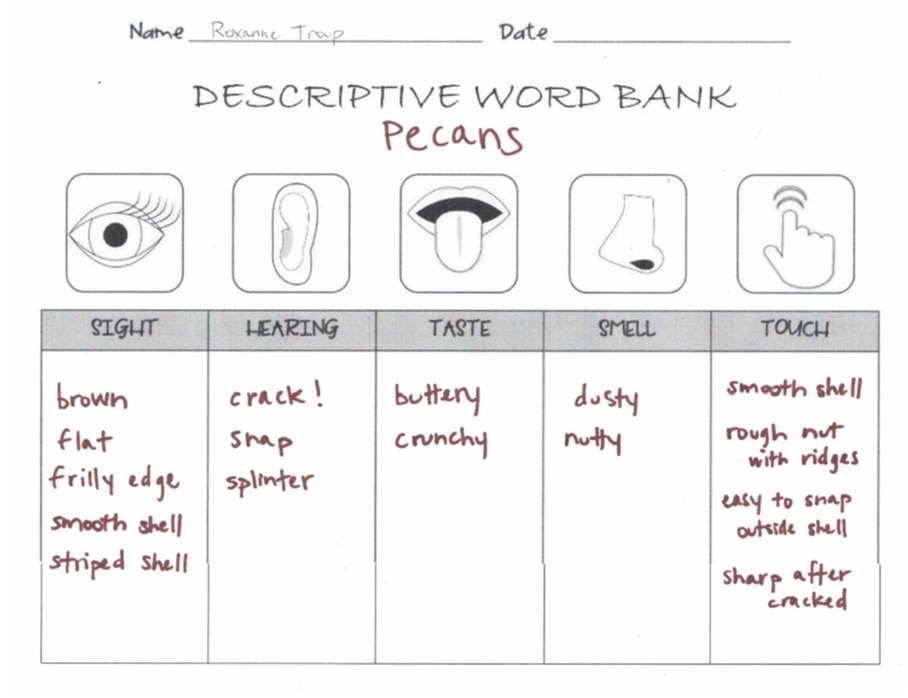
Pecan word bank

Time to write!

6) Have your child circle their favorite word from each column of their word bank.
7) Using the "build-a-poem" worksheet, direct them to add the word to the correct blank(s) on their poem. (You may need to help them change the suffix of their words so that they work in the sentence.)
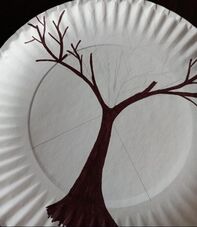
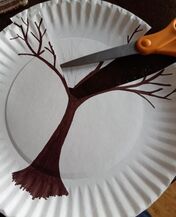
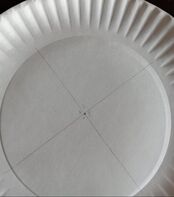
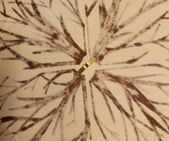
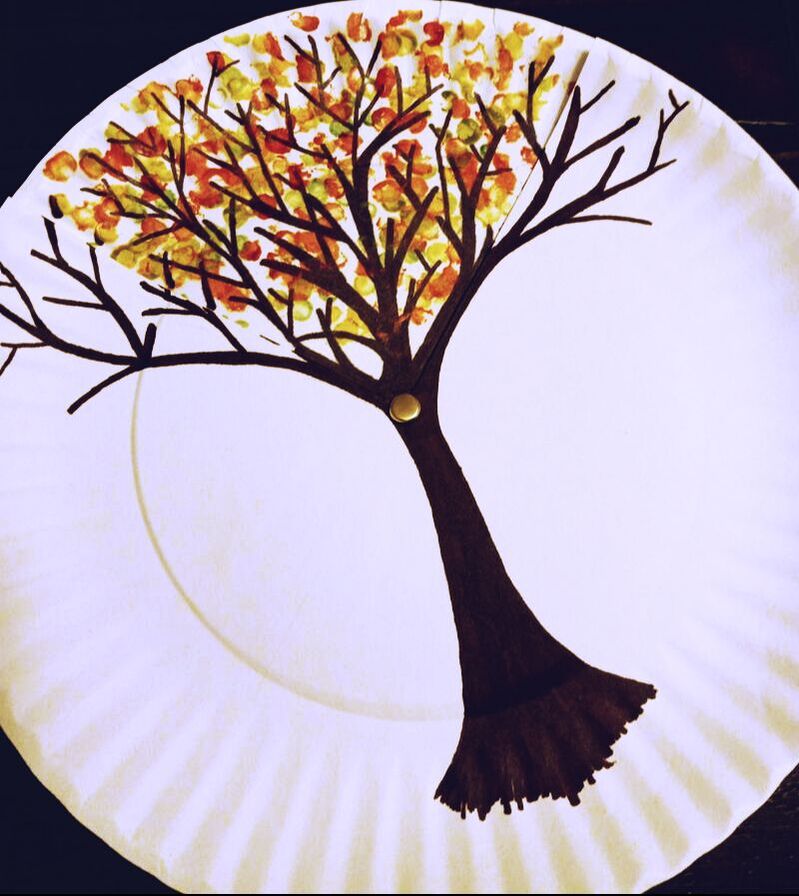
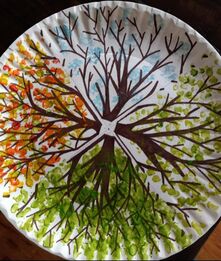
8) Read the finished poem aloud and celebrate!
Buy the Book
More Lesson Plans
pecan illustration
Crafts Inspired by the Book
Pecan poem

My Grandpa, My Tree, and Me Seasonal Tree

1/19/2023

 
​My newest book, MY GRANDPA, MY TREE, AND ME, is a lyrical look at the growth and harvest cycle of pecan trees as told through the relational lens of a grandfather and child.

It highlights each season of the year,  and is a great read a-loud for learning about gardening practices and where our food comes from.

To extend the fun, you can make this simple seasonal tree using materials you probably have on hand.
My Grandpa, My Tree, and Me book cover

Materials:

~ paper plates
~ pencil
~ brown marker
~ acrylic paints
~ scissors
~ brad
~ cotton swabs

Procedure:

Each child will need two paper plates. ​(One will become the trunk of the tree. The other will be its branches.)
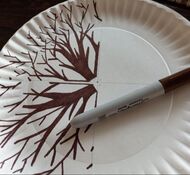
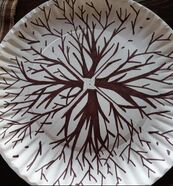
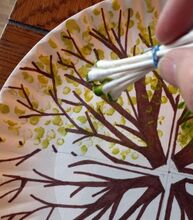
1) Divide both paper plates into four equal sections and mark the middle. On one plate, you may want to label the seasons for future reference. (See image 1)
​2) Choose one plate and draw the tree's trunk. (Hint: Place your drawing in the middle of a "pie piece." See image 2) Color it with the brown marker, and cut out the triangle at the top of your trunk. (See image 3)
Seasonal Tree image 2
*image 2
Seasonal Tree image 3
*image 3
Seasonal Tree image 4
*image 4
Seasonal Tree image 5
*image 5
Seasonal Tree image 1
*image 1
3) On the other plate, use your brown marker to draw branches in each section of the pie as if they were naturally extending from the trunk. (See images 4-5)
4) On both plates, erase any extra pencil lines.
​Hint: For very young children, all this should be done ahead of time.

Time to Paint:

Each child will need a cluster of 4-5 cotton swabs and access to paint. (HInt: A paper plate makes a great paint palate. See image 6. For very young children, instead of labeling each season of branches, you can mark each section with its corresponding leaf color.)
​5) On your branch plate, find the section for spring. Dip the cotton swab cluster into light green paint and lightly sponge it over the branches. (See image 7)
Seasonal Tree image 7
*image 7
6) Repeat for the summer section using a darker green paint. And for "fall" using a mix of green, yellow, orange, and red.
Seasonal Tree image 6
*image 6
7) Before painting the winter section, flip your cotton swab cluster to the clean end and dip into a light blue paint. Allow each section to dry. (See image 8)

Assembly:

8) Once dry, stack both plates together with the colored branches on the bottom. Using the sharp end of a compass or pair of scissors, poke a hole through the center of both plates. Attach with a brad. (See images 9-10)
Seasonal Tree image 9
*image 9
Seasonal Tree image 10
*image 10
Seasonal Tree image 8
*image 8
9) Spin to show off each season in its colorful glory!
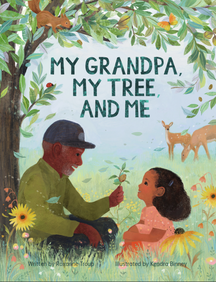
Learn more about MY GRANDPA, MY TREE, AND ME and discover more book activities at the following links:
Read the Book
Lesson Plans Inspired by the Book
More Book Crafts

    Roxanne Troup

    Children's author writing about nature and family.

    Categories

    All
    Book Crafts
    ELA Activity
    Pecan
    Seasonal
    STEM Activity

Powered by Create your own unique website with customizable templates.
  • Home
  • About
    • Bio
    • Media Kit
  • Books+
  • Author Visits
    • School Visits
    • Adult Speaking Engagements
  • Writing Resources
  • Freelance
  • Contact